Continuous Integration - Android

A good workflow will make good developers great and great developers exceptional. A bad workflow will take best engineers productivity down and make them wish they worked elsewhere
It is crucial for every team to get their development workflow in order. Three workflow practices that have gained the spotlight over the time are or as I call them, "The Three C-skeeters".
The Three C-skeeters
Continuous Integration
Continuous integration is a software engineering practice in which isolated changes are immediately built, unit-tested and reported on when they are pushed to the code base. The purpose is to find problems quickly, solve them and deliver more rapidly.
Continuous Delivery
Continuous delivery is an extension of continuous integration (CI). With continuous delivery, any commit that passes the tests can be considered a valid candidate for release.
Continuous Deployment
Continuous Deployment is a software development practice in which every code change goes through the entire pipeline and put into production.
These three concepts are not new. But we, the mobile developers, often avoid these practices either out of ignorance or find it complicated, time-consuming and hard to prioritise due to smaller team and applications.
Through this article, I intend to make a case for Continuous Integration– That WHY one should adopt this process and HOW to achieve it for Android Project.
Brace yourself, Continuous Integration is coming..!
Continuous Integration - Why
Continuous Integration is cheap. Not continuously integrating is costly. It brings multiple benefits such as,
Improves the quality of your code. You can achieve a better quality application.
Increases visibility to specific issues in the code, leading to better communication
Allows you to fail early in the project and correct your mistakes.
Helps you solve problems quickly and makes bugs easier to find.
Reduces integration problems, allowing you to deliver software faster.
Allows you to spend less time debugging and more time adding features, Thus making the developers more efficient.
Reduces overhead across the software development and deployment process.
And show your dexterity in the market. Let everyone know that you have the best practices that produce the highest quality work.
Let's see how you can get started with Continuous Integration.
Continuous Integration - How
To get continuous delivery & deployment, having a reliable continuous integration is mandatory. Hence first we need an integration server like TeamCity, Jenkins or CircleCI. Each one has their plus points. But the fundamental purpose of these tools is to do the following jobs.
It monitors the repository and checks out the code when changes occur.
It builds the system and runs unit and integration tests.
It assigns a build label to the version of the code it just built.
It releases deployable artefacts for testing.
It informs the team of the successful build.
If the build or tests fail, It alerts the team. The team fixes the issue at the earliest opportunity.
Continue to integrate continually and test throughout the project.
I am not going to include the steps to configure CI server you can find many tutorials out there for the same.
Our primary focus is to configure Gradle for onboarding the Android Project with CI server.
So let’s get started with Gradle steps.
The jobs mentioned above to be executed by CI servers are nothing but the Gradle-based tasks as explained below.
Cleaning
The first step is to clean existing artefacts.
It removes the build directory, thus cleaning everything including leftovers from previous builds which are no longer relevant.
Building
This task compiles, tests, and assembles the code. After a few seconds, "BUILD SUCCESSFUL" indicates that the build has completed. To see the results of the build effort, take a look in the build folder.
Testing
It executes the tests written in the project. If it fails, it will stop the further execution and link to HTML reports (one per build variant) will be printed out.
Unit tests run on JVM while instrumentation test requires emulator configured on CI server. Gradle plugin will compile source code found in src/test/java and execute it using the usual Gradle testing mechanisms
Versioning
There are two types of App versions - Version name and Version code. The Version name is what the user will see in Play store, while the version code is unique build number for the developers and auto updating of an application by Play store.
Gradle in combination with Git provides an ability to change the Version name and Version code. It includes two main steps as following.
Adding Git Tag
Tag your last commit with some standardize git tag name say {a}.{b}.{c} where {a}, {b}, {c} are major, minor and build versions.
For example Tag 2.1.0
Reading Version
We have created two methods in build.gradle to update versionCode and versionName on every release.
The first method is getAppVersionName() where we read and parse the version name from git tag using the command-line git tool as following
The function will return the number of commits and the hash of the current commit along with the last Tag.
Hence the result from above function for Tag “2.1.0 “ will be:
2.1.0-1-2346 - This is our Version Name
where,
2.1.0 – (tag)
.1 –> (number_of_commits_since_last_tag)
23456 –> (hash_of_current_commit)
Second method is getAppVersionCode(), where we execute the git command to get the current commit number from Git as following
As commit number increases with each commit, it will always be unique and incremented. Thus it will be used as Version Code.
The above script will automatically grab the latest version at the time of generating Apk.
Signing
Android Apk needs to be signed digitally with a certificate before releasing. In Gradle, one can configure the project to sign the release APK automatically during the build process by creating a signing configuration and assigning it to release build type.
First place release key-store at server and define environment variable for the keystore path, password, key alias and key alias password as you don’t want to push this sensitive information into a source repository for security purpose.
Then define the key-store details in the Gradle file and add it to the "android" section in the build file.
Now every time you build the project under release build-type, It will sign the APK automatically, using the signing configuration specified. Signed APK will be in the build/outputs/apk/ folder inside the project directory.
Release
It is the final step which is to publish signed APK to Google Play Store.
The simplest way to integrate with Google Play Store Apk publishing is by pulling the Triple-T Gradle Play Publisher plugin into your Gradle. The setup instructions in project's ReadMe is straightforward and easy to follow so I won't cover it here.
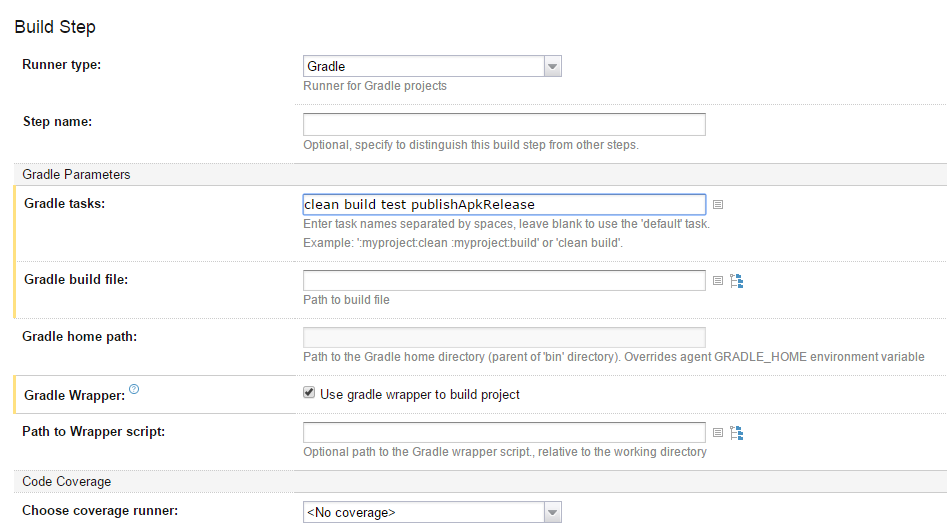
The plugin creates several tasks. At this moment, most important one for us is the publishApkRelease task.
It uploads APK and the summary of recent changes to play store.
Et Voilà, you are ready to go..!
Just add the tasks in the same sequence to your CI server.
CI tool monitors the execution of these tasks and allows to stop the process if one of the steps fails. It also sends out notifications about the build success or failure.