Calabash is an open source cross-platform framework developed by Xamarin that enables you to write and execute automated acceptance tests for mobile apps. It supports Cucumber which allows you to express the behavior of your app using natural language that can be understood by non-technical QA guys.
Introduction to Mobile app testing
Mobile application testing is a process by which apps developed for mobile devices is tested for its functionality, usability, and consistency. Similar to web applications, We can also perform Functional, Performance, Usability, Security, and Load testing for verifying it's behavior and functionality.
Prerequisites
Installing Calabash framework
Step #1 Install Calabash- OS X
Execute the following command in your terminal to install calabash:
$ curl -sSL https://raw.githubusercontent.com/calabash/install/master/install-osx.sh | bash
This will take a few minutes to get installed and you’ll get the following message at the end of installation:
Done! Installed:

calabash-ios:       0.19.0

calabash-android:   0.7.3

xamarin-test-cloud: 2.0.0.pre2

Execute 'calabash-sandbox update' to check for gem updates.

Execute 'calabash-sandbox' to get started
Step #2 Link Calabash framework with your project
Go to project directory and open terminal in that directory and start calabash using the following command:
$ calabash-sandbox
This terminal is now ready to use with Calabash.
To exit, type 'exit'
Now, link calabash framework using the following command:
$ calabash-ios download
Once you execute this command you may get may see the following informative message:
----------Info----------

caution: excluded filename not matched:  __MACOSX/*

caution: excluded filename not matched:  calabash.framework/.DS_Store
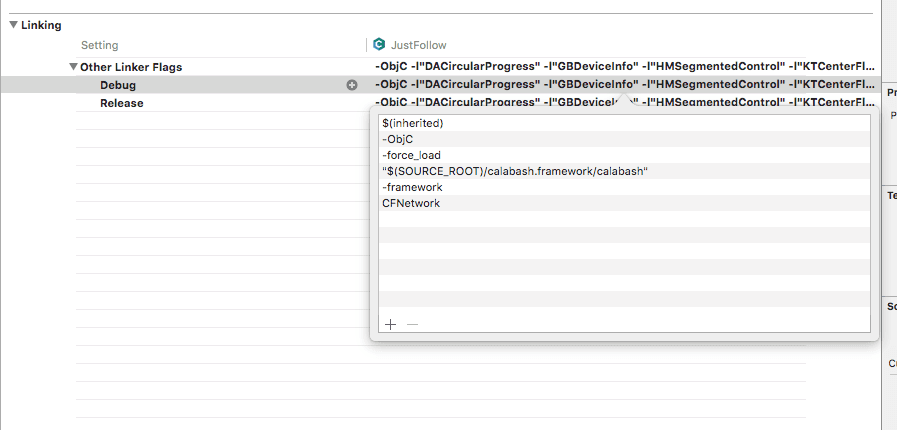
Next, open your project in XCode and go to Build Settings. Now, search for the term "Other Linker Flags".

Double click on “Debug” and check if CFNetwork Framework is added or not.

If not, then click on ‘+’ button displaying on left bottom corner and type following command:
ObjC -force_load "$(SOURCE_ROOT)/calabash.framework/calabash"
Once you enter this command, the screen will look like above. Now run your application in the emulator.
You're ready with Calabash for automating your iOS app!

We are a family of Promactians
We are an excellence-driven company passionate about technology where people love what they do.
Get opportunities to co-create, connect and celebrate!
Vadodara
Headquarter
B-301, Monalisa Business Center, Manjalpur, Vadodara, Gujarat, India - 390011
Ahmedabad
West Gate, B-1802, Besides YMCA Club Road, SG Highway, Ahmedabad, Gujarat, India - 380015
Pune
46 Downtown, 805+806, Pashan-Sus Link Road, Near Audi Showroom, Baner, Pune, Maharashtra, India - 411045.
USA
4056, 1207 Delaware Ave, Wilmington, DE, United States America, US, 19806

Copyright ⓒ Promact Infotech Pvt. Ltd. All Rights Reserved

We are a family of Promactians
We are an excellence-driven company passionate about technology where people love what they do.
Get opportunities to co-create, connect and celebrate!
Vadodara
Headquarter
B-301, Monalisa Business Center, Manjalpur, Vadodara, Gujarat, India - 390011
Ahmedabad
West Gate, B-1802, Besides YMCA Club Road, SG Highway, Ahmedabad, Gujarat, India - 380015
Pune
46 Downtown, 805+806, Pashan-Sus Link Road, Near Audi Showroom, Baner, Pune, Maharashtra, India - 411045.
USA
4056, 1207 Delaware Ave, Wilmington, DE, United States America, US, 19806

Copyright ⓒ Promact Infotech Pvt. Ltd. All Rights Reserved
